Google Chromecast needs a stable WiFi connection for casting purposes. The casting device (smartphone or PC) must be connected to the Chromecast’s home WiFi to cast a video or audio file. You can’t cast media files onto Chromecast without a common WiFi network. While setting up Chromecast for the first time, you have to connect the device to a WiFi network.
After that, your Chromecast will consider this as your home network and connect automatically to the network whenever you turn it on. If the WiFi keeps disconnecting on the Chromecast or if you want to connect the Chromecast to a new WiFi, then you need to forget the WiFi you have connected and connect the device to a new WiFi. All these procedures can be done only with the Google Home app. In this guide, you will learn the steps to connect the Chromecast to a WiFi network.
Note: Chromecast will store only one WiFi network.
How to Connect Chromecast to New WiFi
Before stepping into the connection process, make sure to connect your smartphone to the same WiFi network as that of your Chromecast.
#1. Open Google Home on your Android Phone or iPhone. If you don’t have the app, install it from the Play Store or App Store.
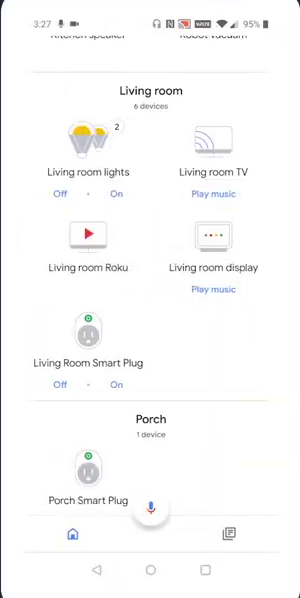
#2. Tap the Devices drop-down button and click your Chromecast device’s tile.
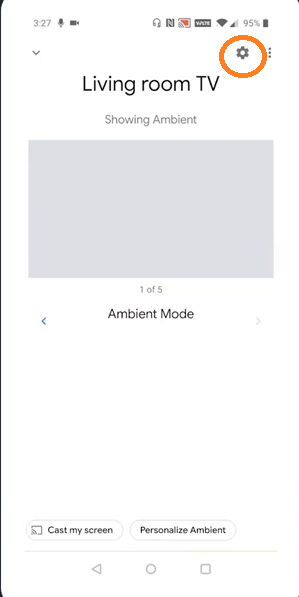
#3. Next, click on Device information (Settings icon) at the top of the screen.
#4. Scroll down until you find the WIFI option. The connected WIFI will be displayed here. Tap on the WIFI option.
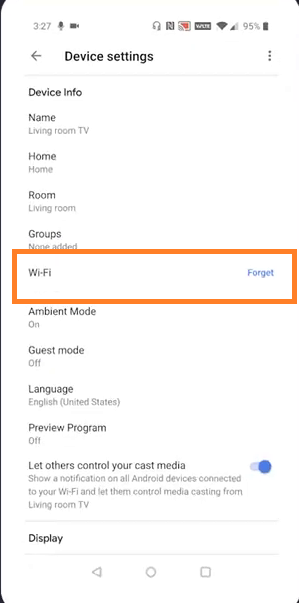
#5. On the pop-up, tap the Forget network button.
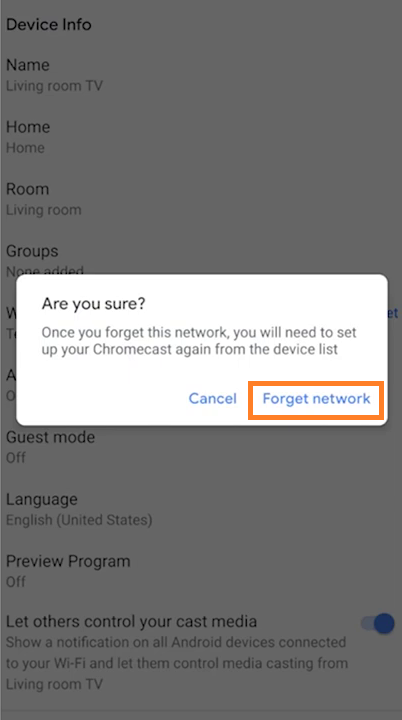
Now, you have successfully removed the current WiFi network from your Chromecast. Your Chromecast device will be removed from the Google Home app.
Connect Chromecast to WiFi
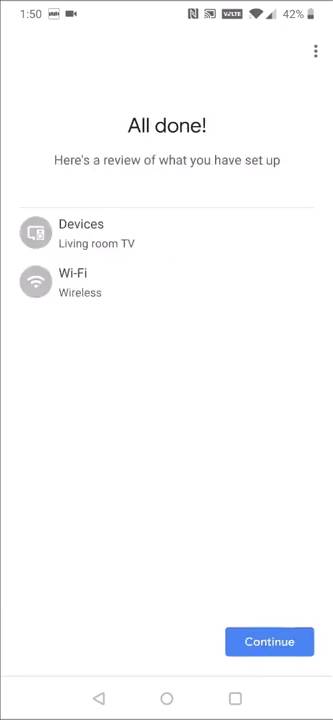
After removing it, you need to set up the Chromecast with the Google Home app again to connect the device to the new WiFi.
#1. Navigate to the home screen on the Google Home app.
#2. Hit the Plus icon at the top.
#3. Click the option Set up device and select New devices.
#4. Tap Home and select the option Next.
#5. Now, wait until the Google Home app identifies your Chromecast device.
#6. Click Next and pair the app with your device by following the on-screen prompts.
#7. Choose a location and select the option Next.
#8. On the next screen, choose the new WiFi network you intend to connect.
#9. Type the password for the WiFi network and click Next to change the WiFi network on Chromecast.
How to Change WiFi Network on Google Chromecast Via Reset
Another way to change the WiFi network is by resetting the Chromecast device. All settings and data, including the WiFi, will be deleted by resetting the device. Now, you need to set up the device again from scratch and connect the Chromecast to the new WiFi network using the Google Home app. You can refer to the procedure mentioned above to connect the device to the WiFi. This method is one of the effective ways to fix the Chromecast not working issue.
How to Connect Chromecast to WiFi Without Google Home
If you plan to buy the latest Chromecast device on Google TV or using one already, you can use the steps below to change the WiFi network using the Chromecast Voice Remote that comes with the device.
#1. Tap the Profile account icon in the upper right corner of the Google TV screen.
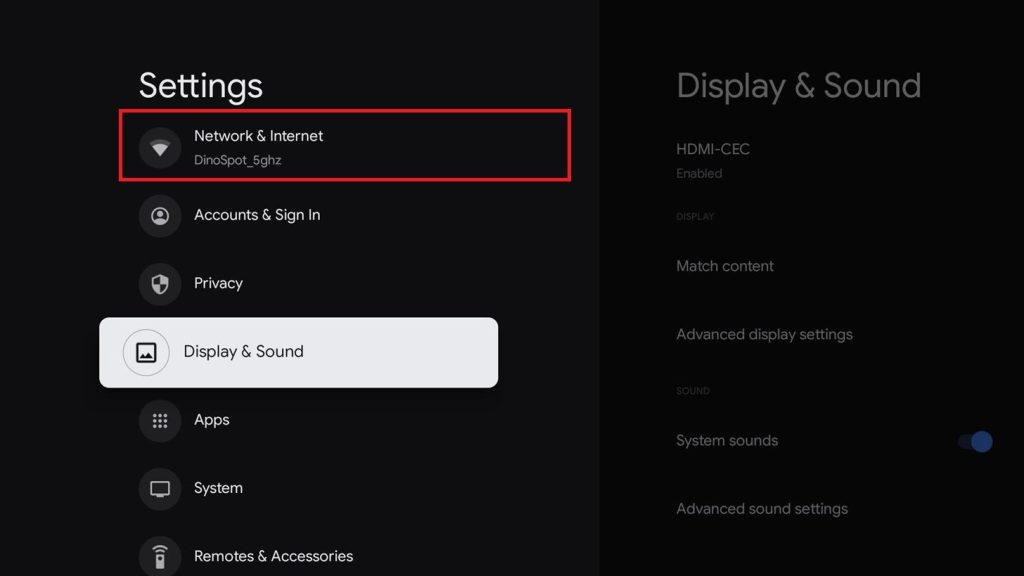
#2. Choose the Settings option from the drop-down menu.
#3. Under Settings, select the Network & Internet option.
#4. Choose the WiFi network you want to connect to from the list of available WiFi networks. If the WiFi network is secured, you will be asked to enter the password.
#5. Enter the WiFi password in the respective field using the virtual keyboard.
#6. After entering the password, click the Tick button. You have now changed the WiFi network on your Chromecast with Google TV without the Google Home app.
FAQ
If Chromecast is not connecting to a WIFI network, it may be due to the loose connection of the device or the entry of the wrong WiFi password. To fix it, check whether the device is plugged properly and enter the correct WiFi password.
Yes, The device will automatically connect to home WiFi after setting it up for the first time.
Yes, you can Chromecast media files to TV without the internet using the Guest Mode. But you can cast only the offline media files.
Yes. You can connect Chromecast to WiFi without a remote by using the Google Home app.